Manual Setup
Manual Integration enables developers to connect Paycoinly payment services to their platform using a custom-built integration approach, allowing your users to make payments through Paycoinly and have your platform record them.
Prerequisites
Before you can start manual integration, ensure you have the following:
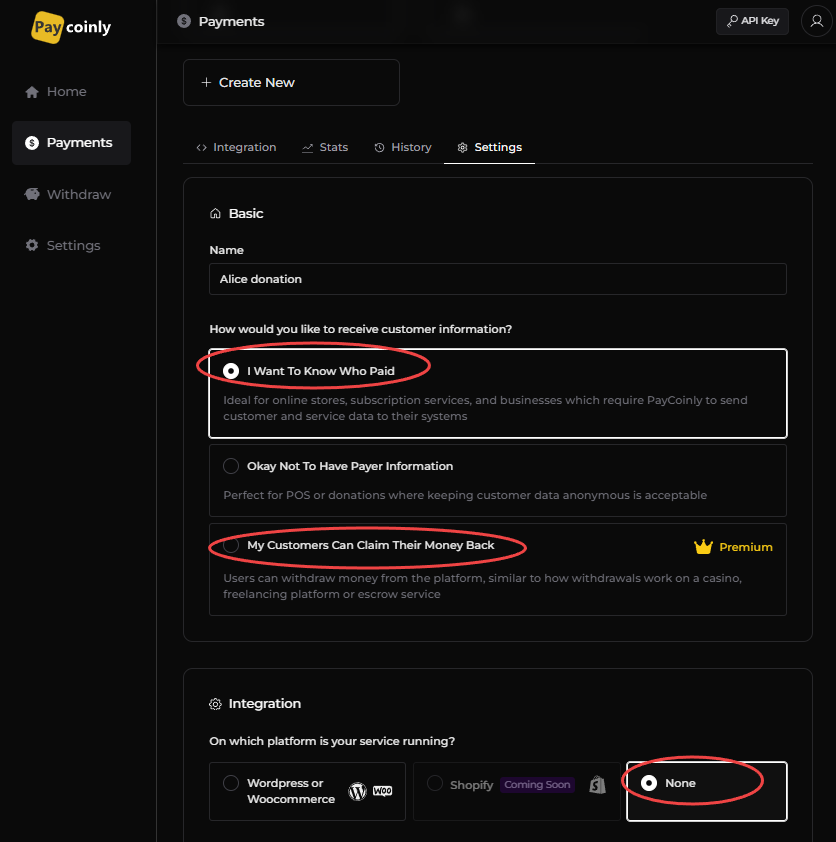
- How would you like to receive customer information? is set to one of the followings in Payments > Settings > Basic
- I Want To Know Who Paid
- My Customers Can Claim Their Money Back
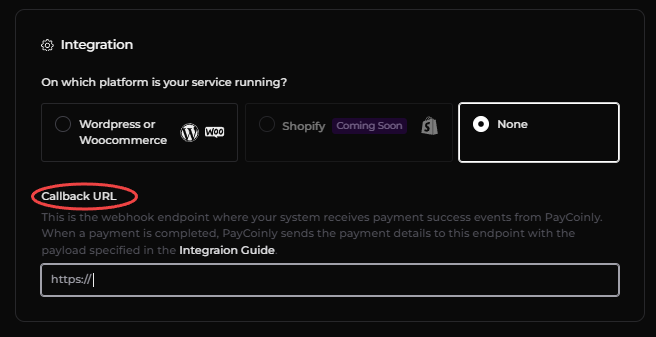
- On which platform is your service running? is set to None in Payments > Settings > Integration
Add a webhook to your backend
PayCoinly will call this endpoint when the payment is successfully completed. Implement the necessary backend logic to record the payment in your system.
Endpoint
The webhook URL should be the one you set in Settings > Integration > Callback URL in your payment.
The webhook should be a POST route.
Header
The webhook will receive a request containing x-api-key header. Please check this page to get API key in your Paycoinly dashboard.
To secure this webhook and prevent unauthorized or arbitrary access
- Validate that the
x-api-keyheader in the incoming request exactly matches with the above value. - Only allow the route to be executed if this API key is correct. Otherwise, reject the request.
Body
The endpoint expects the request body to contain the below fields.
- basic fields about the payment
- fields passed to
metadatawhen generating a payment token in the next step
All fields are in string format.
| Field | Description |
|---|---|
| chainId | Chain ID of the payment coin |
| symbol | Symbol of payment coin |
| totalPaid | Total amount of coin paid in gwei (or the smallest unit) |
| netPaid | Paid amount after transaction fee |
| claimable | Amount to your users to claim if the payment is set to My Customers Can Claim Their Money Back, otherwise "0" |
| txLink | A link to payment details |
metadata fields | metadata fields in destructured |
Get a payment token
In your backend, make a request to Payment Token Generation API to generate a payment token, which will be used in the next step.
Add a payment UI to your frontend
Use the following URL to show Paycoinly payment page.
https://app.paycoinly.xyz/pay?token={token}
where token is the payment token obtained from the above step.
Here is a sample HTML snippet that you can use to embed the payment UI.
- Light
- Dark
<button onclick="window.open('https://app.paycoinly.xyz/pay?token={token}', 'Pay with PayCoinly', 'width=800,height=550,left=200,top=100');">
  <img src="https://app.paycoinly.xyz/logo/light.svg" style="width: 150px;" />
</button>
<button onclick="window.open('https://app.paycoinly.xyz/pay?token={token}', 'Pay with PayCoinly', 'width=800,height=550,left=200,top=100');">
  <img src="https://app.paycoinly.xyz/logo/dark.svg" style="width: 150px;" />
</button>
Receive payment success event in your frontend Premium
Add the following code to your frontend to receive payment success event.
window.addEventListener('message', (event) => {
  if (event.origin !== 'https://app.paycoinly.xyz') {
    return;
  }
  if (event.data.type === 'PAYCOINLY_PAYMENT_COMPLETE') {
    // event.data.payload contains price, currency and metadata
    console.log(event.data.payload);
  }
});
Please see Success Event page to check how this event is triggered.
Best practices
This section also describes best practices for implementing manual integration.